
« Back to Knowledge Base
Each virtual set is stored in a single folder.
A sample Virtual Set containing a 1080p UV Map file can be downloaded below:
This UV map file can be manipulated in Photoshop (in a 64bit project) as needed.
vMix Virtual Set Specification 1.0
Virtual Sets in vMix utilise open file formats to make it easy to implement custom sets.
The specification below details each component of a typical virtual set.
Virtual Set Directory
Each virtual set is stored in a single folder.
Virtual Set Configuration
The virtual set configuration is XML in format and can include the following tags:
<virtualSet>
<input name="Background" x="0" y="0" zoomX="1" zoomY="1" rotateX="0" rotateY="0" rotateZ="0" cropping="0,0,1,1" dynamic="false">Background.png</input>
<input name="Screens" x="0" y="0" zoomX="1" zoomY="1" rotateX="0" rotateY="0" rotateZ="0" cropping="0,0,1,1" dynamic="true" uvmap="Screens.png">blank.png</input>
<input name="Talent" x="0" y="0" zoomX="1" zoomY="1" rotateX="0" rotateY="0" rotateZ="0" cropping="0,0,1,1" dynamic="true" uvmap="Talent.png">blank.png</input>
<zoom name="Close Up" x="0" y="0" zoom="4" />
<zoom name="Medium Shot" x="0" y="0" zoom="2" />
<zoom name="Full" x="0" y="0" zoom="1" />
<zoom name="Custom" x="0" y="0" zoom="1" />
</virtualSet>
A maximum of five input elements and four zoom elements can be included within a single virtual set.
To visually adjust the coordinates in a set, set each value to the defaults above, open the set in vMix to move the overlay layers
then click the Export button to save the changes.
Virtual Set Images
All images must be in either JPG or PNG format and must be within the same directory as the Virtual Set Configuration.
UV Map Images (vMix 13 and higher)
UV Map images are gamma corrected 16 bit per channel PNG files (64 bit including Alpha)
A sample Virtual Set containing a 1080p UV Map file can be downloaded below:
This UV map file can be manipulated in Photoshop (in a 64bit project) as needed.
Exporting a 64 bit depth file from Photoshop
- When creating your Photoshop file, make sure the colour mode is set to 16bit (16 bits/channel)
- Create your UVMap
- To save, go to File -> Save As (do not go to the Export menu) then save it as a PNG file
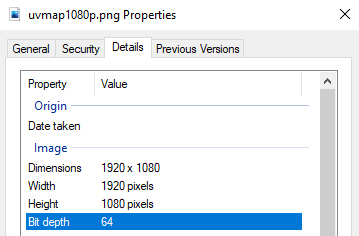
To check it has successfully saved as a 64 bit depth PNG file, go to the file in Windows. Select Properties, then select the Details tab. It should say 64 next to Bit Depth.
Last Updated: Wednesday, August 25, 2021 11:39:15 AM